
We don't watch a TV a lot with my wife. So, we didn't want to have a black rectangle as a main thing in our living room. But we do like to watch a movie etc. So, the goal was an amazingly simple-invisible TV.
Check the video in step 8.
Supplies
- projector
- white screen with electric drive
- Shelly devices (1PM, RGBW2, socket)
- engine for the lift500 x 25 x 4 mm aluminum
- 5mm threaded rod
- Bluetooth speaker
- Chromecast
- generic tools like screwdriver, drill, screws, lock nuts etc.
Step 1: Don't Do It.
Yeah, really. Reason? It takes too much time. How much? Well with these instructions it can be about 60+ hours. I stopped counting my time in about 80+.
Only finding the right projector is for ages. After this project, I am quite sure, that choosing the right projector (when you have only reasonable budget) takes at least 10 hours. There is about thousand different parameters to consider.
One of the reasons I chose this way of invisible TV was also price of TV with 84 inches. Few years back it was like $5000 but now its easily available in the same price as projector.
Step 2: Are You Crazy Enough? Let's Start


- Height of the shelf. It shouldn't be too high, so it doesn't take too much space (thus you don't have a space for movie), but there also must be enough space for the flowerpots.
- I can recommend splitting the shelf to separated boxes so when there is some water problem, it is limited in one box only.
- Each box should be water tide.
- It is nice to have the front panels removable so you can access the pots easily.
- As you can see there is a hidden place for the screen. In our case we have there 10cm height.
- Don't forget some space for the screen where it will roll out.
- If you have a given distance from the screen (as we've got since the ceiling light was already in place), you must make sure the projector can give you picture with right size for your screen. Most projectors have some zoom options which is helpful but not much. Just check the projector manual and do the math.
- Because you don't want to hit your head to the projector when you are going for new snacks, the projector will be a bit angled. So, the project must be able to compensate the angle. Again, do the math for your specific scenario.
- Dimensions are important too. Usually there is a limited space above the dry wall ceiling. So, height of the projector with the other stuff above must fit in. We have about 32cm height there so it's very generous and even, so I was almost not able to fit it in.
- Don't bother if the projector isn't smart. If your favorite projector is without Netflix app or other things, just use Chromecast or something similar.


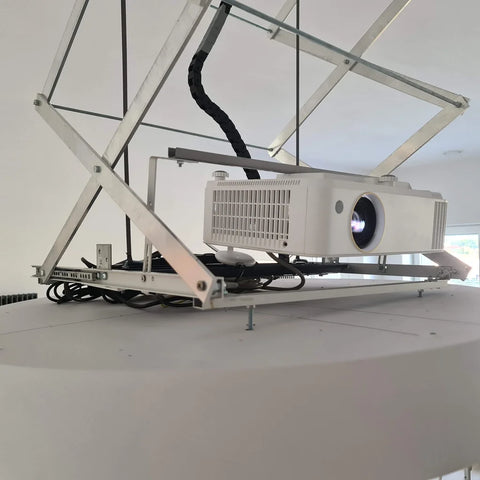
Important is to use strong aluminum. Our dimensions are 500x25x4 mm. Which is reasonable for all important parameters like:
- price
- flexibility
- strongness
- weight
When you have all plates ready with holes just put two plates above each other and tighten it with 5mm screws in middle holes. It is important to use a lock nut so it won't be loosed when the lift is moving up and down.
The next and last step is to put side holes of two paired plates together and put the threaded rod in the holes. Next put one lock nut to the end of the threaded rod. Repeat this until you have all plates and threaded rods together.
When all is together it is important to tighten all lock nuts just right. It cannot be too lose (the lift wouldn't be stable) or too tight (the lift wouldn't be moving).

Otherwise, it's just a square from some aluminum parts I have found home and put together with light through holes drilled in the light. It is better to have longer screws so you can adjust the position of the light when it is in the top position.

The engine is just a regular that is used for outside window shades. I got it also with the mounting rail,so it was quite simple to put it to the square mount.
I put the engine in the middle. It was a mistake. It took a lot of space that could be used for the projector. I recommend putting it on the opposite side to the projector.
The position of the lift is determined by the winding of the belts, which move thanks to the engine.


There are exactly 8 Shelly devices controlling all involved parts.
1) 3x Shelly 2PM to control white screen, lift engine and outside shades.
3) Shelly Bluetooth Button to start the moving.
4) 3x Shelly RGBW2 to control lights for flowers and light under the projector.
I am using about fifty other different Shelly devices around my flat, so it was quite easy to use it and I can recommend it to anyone. You don't need to use any gateway it's all connected to wifi and to the cloud if want so you can manage it from anywhere. If you are brave enough to read it to this point, it will be really easy to setup the Shelly. :)
2. It will create wifi AP named shellyXXXXXXXXX
3. Connect your phone (laptop, pc) to the shelly AP and go to 192.168.33.1 in the browser
4. In the web UI setup connection to your wifi
5. You can set fixed IP, which is something I can recommend
6. Or you can just put wifi credentials and then you have to find what IP it has
7. Access the Shelly
- Download Shelly Smart Control app to your phone and follow the instructions there
- Or go to the IP of the device
Here is a video, how nicely it is moving. I am trying to win the Shelly contest, so I talk about Shelly there a lot :-D
1) Lift, screen, and shades are going down using the Shelly 2PM.
2) Lights are dimmed and turned off using Shelly RGBW2.
3) Electricity for the projector is turned on using Shelly Plug and projector is set to turn on when it has a power.
4) Chromecast is turned on.
It all could be controlled only with Shelly devices scripting, but since I am using Home assistant for other things I have it all done in Home assistant automations.

There is a lot of positioning that must be done after all is in place:
- The screen (how much down it goes)
- The top and bottom lift ends
- Angle of the projector
- Left/right and top/bottom positioning the projector beam, so it aims to the middle of the screen

- Too clumsy aluminum plates. I wanted to save some money so originally, I bought 500x15x2 aluminum. It was usable but lift movement was unstable.
- The top position was reached when the stop button on the engine was pressed. Again, usable solution, but the stop button stopped working properly and the lift was trying to put it through the dry ceiling. It is better to set ending positions in the motor.
- One safety screw for belt winding failed and the light was suddenly hold only on one side so it was angled, and the engine couldn't reach the stop button. The other belt was still working but connection in the bottom failed because of the force the engine was putting on it and the whole construction just fell. To fix this I used better safety screw and ditched the stop button and used ending positions set directly in the engine.
I was there when it happened. I saw something is wrong, but I couldn't stop the lift fast enough (I would have to open Home assistant app in the phone, find the lift etc.). So, after this disaster I made safety precaution. When I press any light switch in the room, the lift stop moving. It's again simple thanks to Shelly since under all my switches is some Shelly. So each time the switch is pressed, it toggle the light and also stop the lift.
Step 12: I Know What Is in Your Head Right Now

Where the hell can I get this masterpiece from the video?
It's my three-year-old son painting. Yes, he is really good, and it is not for sale. Unless I am not winning the contest, then it is for five hundred dollars. :-D
Step 13: Most Important Part
Say big thank you to your wife for her patience. Bring her flowers and cherish her for all the lost time on this.


